Mod Organizer 2 · Setup guide How to set up Mod Organizer 2
Install Mod Organizer 2, make your first instance and pull a mod in from Nexus. Our Skyrim and Fallout 4 guides start from here, so this is the one to do first.
- Version2.5.2
- TimeAbout 10 minutes
- Free space400 MB
- Updated
Tick each step off as you finish it. Your place is saved on this device.
What you need
- A game to modOur guides use it for Skyrim Special Edition and Fallout 4.
- Windows 10 or 11Mod Organizer 2 is Windows only.
- A free Nexus Mods accountSo you can download mods. Premium isn't needed.
- The Gaming AI appFree to install: get it from the home page. Its game cards link to every download in our guides.
Step 1
Download Mod Organizer 2
Mod Organizer 2 is a mod manager. Instead of dumping mod files straight into your game folder, it keeps every mod in its own separate folder and layers them together only while the game is running. Your actual game install stays clean, and you can turn any mod on or off without reinstalling anything.
Right-click the Mod Organizer 2 card in Gaming AI, or click its download button, and the installer downloads to your computer.
The screenshots show Fallout 4. Setting up Skyrim works exactly the same way. Wherever you see Fallout 4 below, pick Skyrim Special Edition instead, and use a folder like C:\SkyrimModded.
Once per game. Each game you mod gets its own copy of Mod Organizer 2 and its own instance, and they never interfere with each other. If you're setting up Skyrim and Fallout 4, you'll do this guide twice, into two different folders.
Step 2
Run the installer
Once it's downloaded, run the .exe to start the installation.
-
Pick an install folder that isn't inside Program Files. We use
C:\Fallout4Moddedin this example. Windows locks Program Files down with special permissions, and that causes problems later on.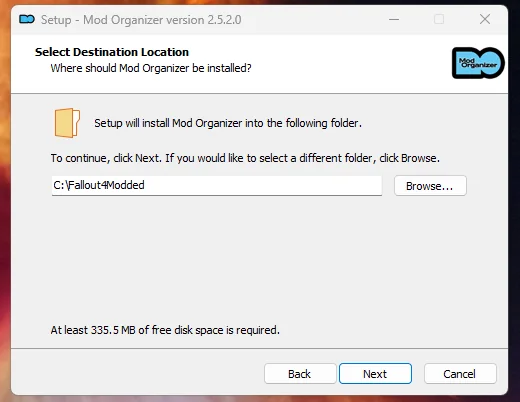
-
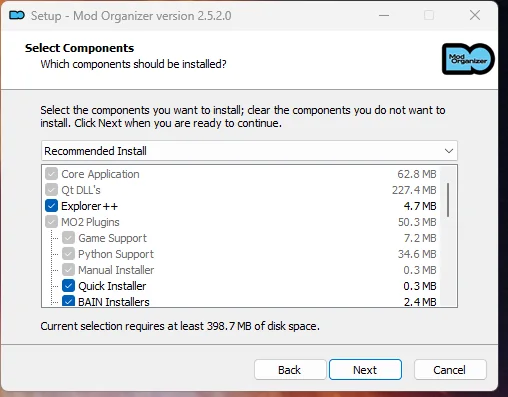
Leave the components on Recommended Install and click Next.
-
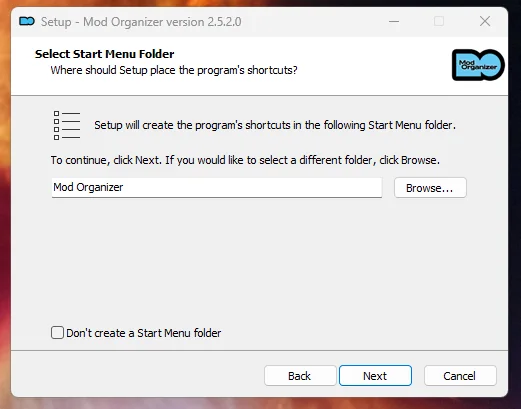
Leave the Start Menu folder as it is, or rename it after the game if you plan to keep several copies around. Click Next.
-
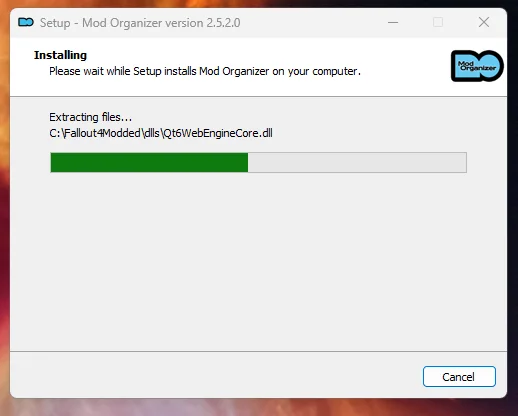
Let the installer finish extracting, then launch Mod Organizer 2.
Step 3
Create your instance
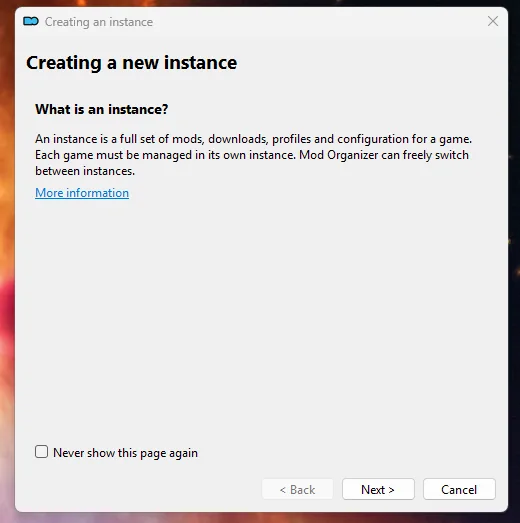
The first time Mod Organizer 2 opens, it walks you through creating an instance. An instance is a complete set of mods, downloads, profiles and settings for one game. Click Next.
-
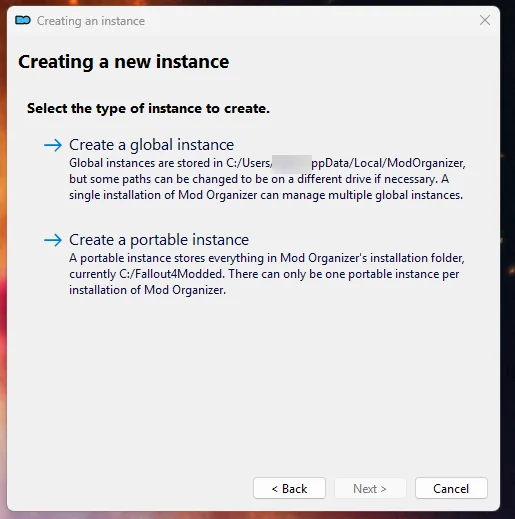
Always choose Create a portable instance. A portable instance keeps every mod, download and profile inside the Mod Organizer folder you just made, instead of scattering them through AppData. That makes the whole setup much easier to back up, move to another drive, or delete and start over.
-
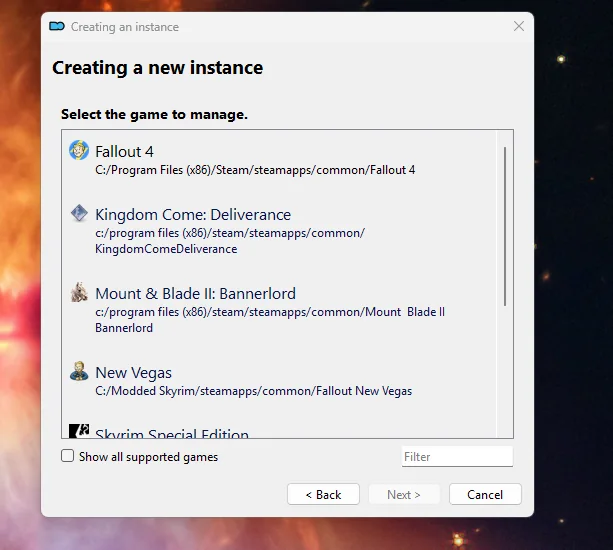
Select the game you want to manage. Mod Organizer scans for installed games on its own. If yours is missing, tick Show all supported games or browse to its folder. We're setting up Fallout 4 here.
-
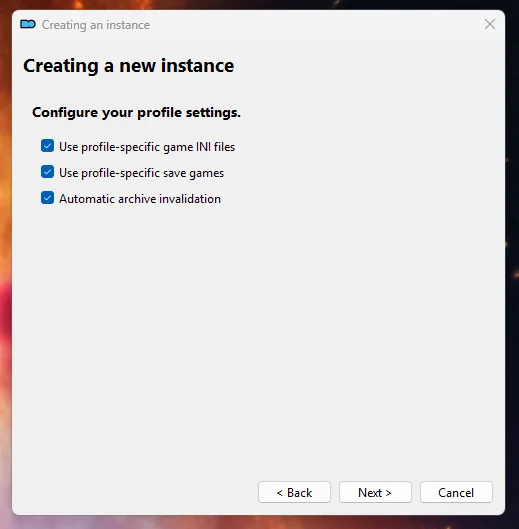
Leave all three profile settings checked. Automatic archive invalidation is the one that matters most: plenty of mods ship loose files, and without it the game quietly ignores them.
-
Confirm the data folder. It should match the folder you installed to, here
C:\Fallout4Modded. Click Next and finish.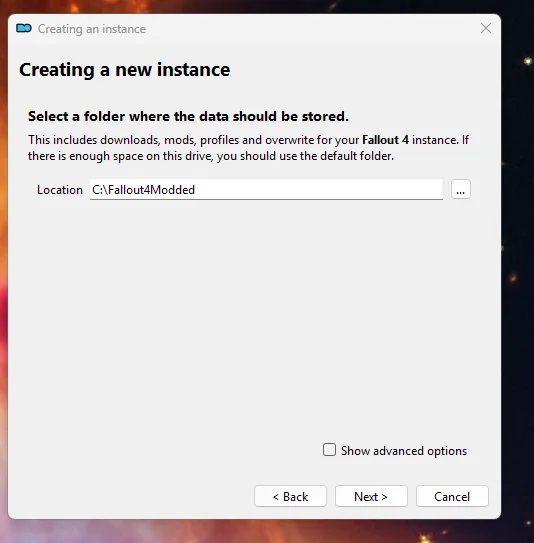
Step 4
Find your way around
Mod Organizer 2 opens on your new instance. It looks busy at first, but you only ever deal with four parts of it.
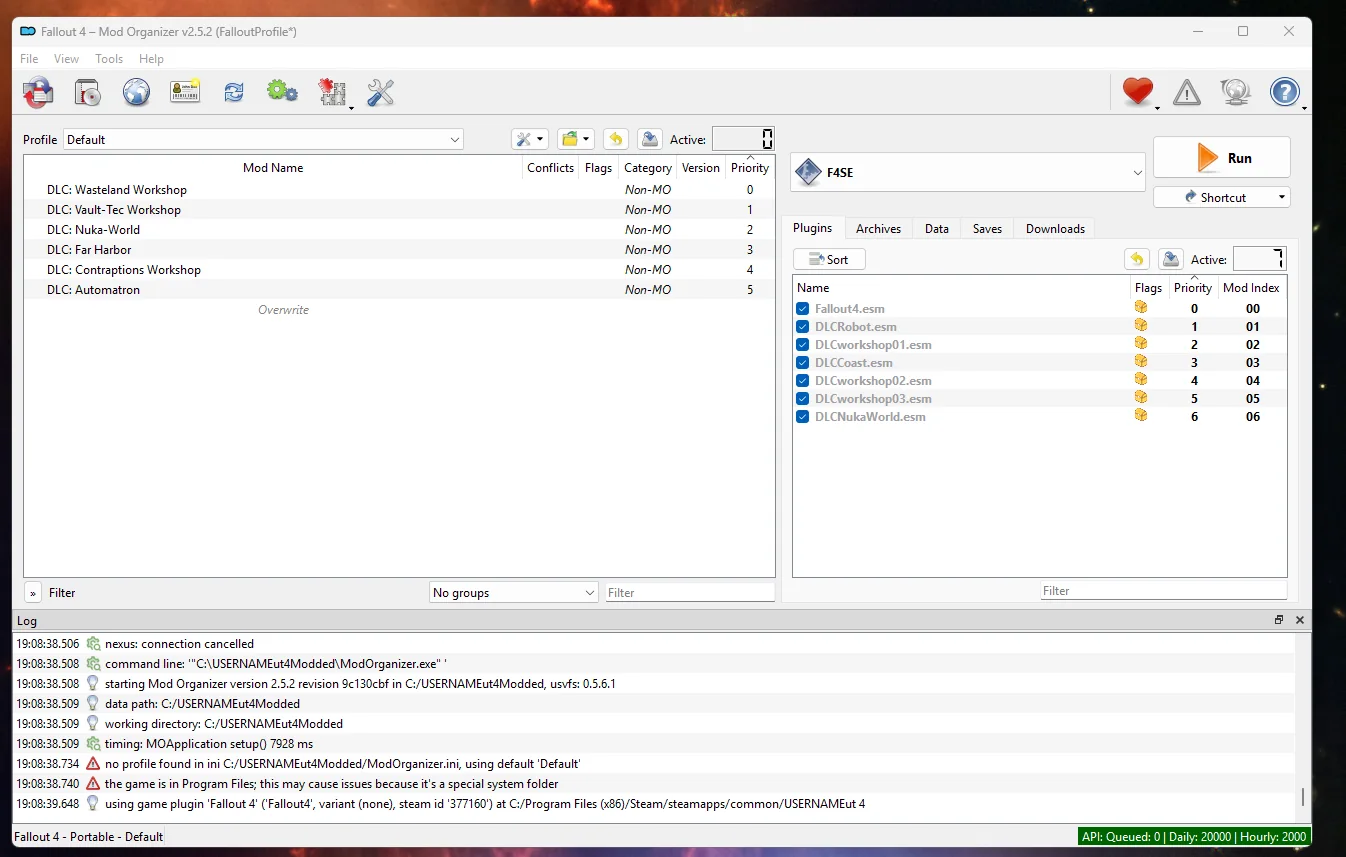
- Left pane: your installed mods. The checkbox turns a mod on or off, and Priority decides who wins when two mods change the same file. Higher priority overwrites lower.
- Right pane, Plugins tab: your load order, the
.esmand.espfiles. A guide will tell you if something needs to sit in a particular spot. - Right pane, Downloads tab: everything you've pulled from Nexus. This is where you confirm a download landed in the right instance.
- Top right: the executables dropdown and the Run button. This is how you launch the game, and once you're modding it's the only way you should launch it.
DLC shows as Non-MO. Your game's DLC appears in the left pane marked Non-MO. That just means the game manages it rather than Mod Organizer. Leave those entries alone; they're supposed to look like that.
"The game is in Program Files." If the log at the bottom says this, it's talking about your game install, not Mod Organizer. It's usually fine, but moving your Steam library out of Program Files avoids a whole class of permission headaches later.
Step 5
Install a mod from Nexus
Installing a mod is the same handful of clicks every time. We use Buffout 4 below, but the process is identical for every mod on Nexus. Buffout 4 is a Fallout 4 mod, so if you're setting up Skyrim, read along here and do it for real with the first mod the Skyrim guide asks for.
Download it
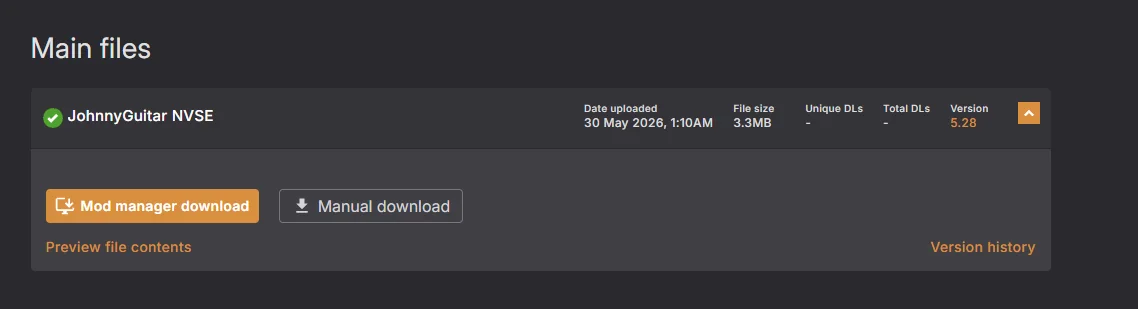
On the Nexus mod page, open the Files tab and find the file you want under Main files. Click Mod manager download, not Manual download. Mod manager download is what hands the file to Mod Organizer automatically.
A download window opens. Before you click through it, read the Mod file requirements list: these are the other mods this one needs to work. Grab those first, or the mod will simply do nothing in game.
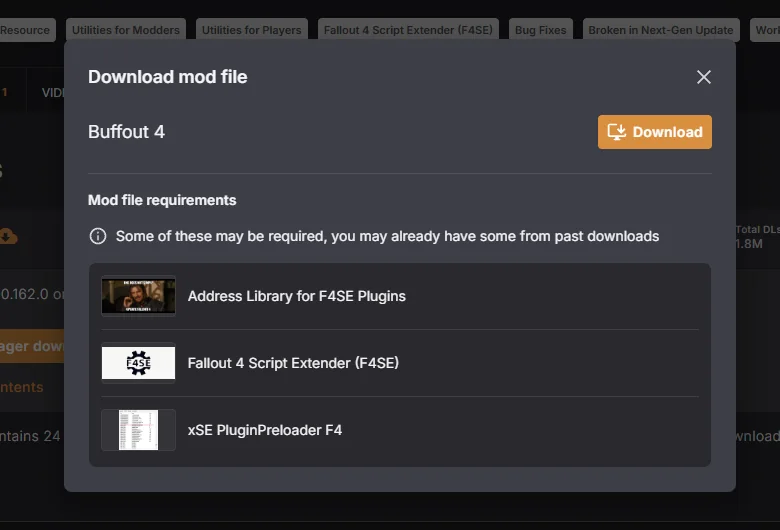
Click Download. Without Nexus Premium you'll get an extra page asking you to pick Slow download; that's fine, it just takes longer. The first time, your browser may also ask permission to open Mod Organizer. Allow it.
Check it landed
Switch to the Downloads tab in Mod Organizer and check the file is there and marked Downloaded. Check the game shown in the dropdown at the top too. If you keep several instances, this is where you catch a mod arriving in the wrong one.
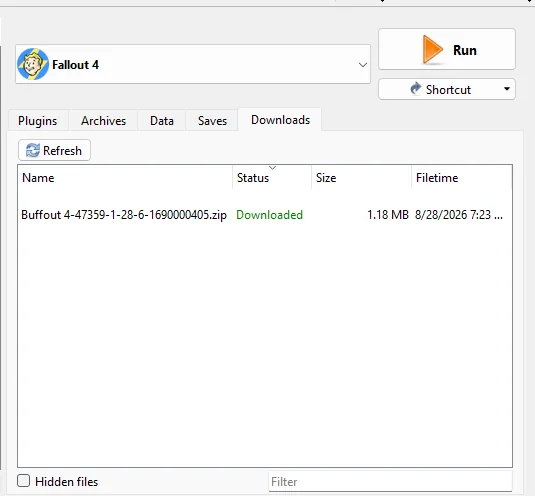
Nothing showing up? If clicking Mod manager download does nothing at all, Mod Organizer isn't registered to handle Nexus links. Open Settings › Nexus, associate it with NXM links again, then try the download again.
Install it
Double-click the file in the Downloads tab. You'll usually get a No category found message first. That's Mod Organizer saying the mod's Nexus category isn't mapped to one of its own.
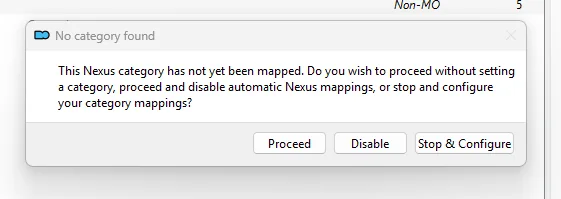
Click Proceed. Categories are only for grouping mods in the left pane once you have a hundred of them. They have no effect on whether a mod works, so you can proceed past this every time without setting anything up.
Tired of seeing it? Disable turns off automatic Nexus mappings so the message stops appearing. Stop & Configure lets you set up your own categories if you want them. Neither is required.
Next comes the Quick Install window. The suggested name comes from the mod page and is almost always fine. It's only the label the mod carries in your left pane, so shorten it if you like. Click OK.
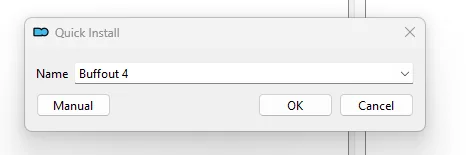
When to click Manual. A handful of mods offer install options: different textures, optional add-ons, compatibility patches. That's when you click Manual so you can choose. For a normal mod, OK is all you need.
Turn it on
The mod now appears in your left pane, but look closely: its checkbox is empty. It's installed, but it isn't doing anything yet.
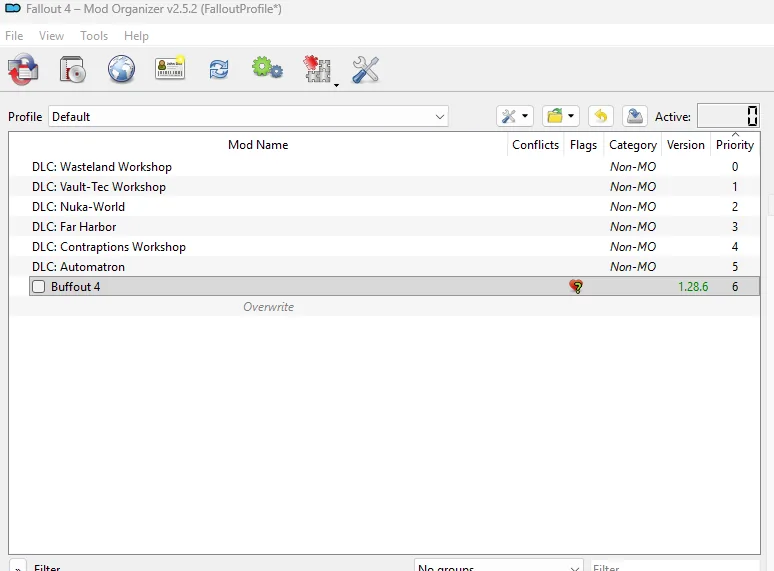
Tick the checkbox to activate it. That's the step people forget, and it's why a mod that "installed fine" does nothing in game.
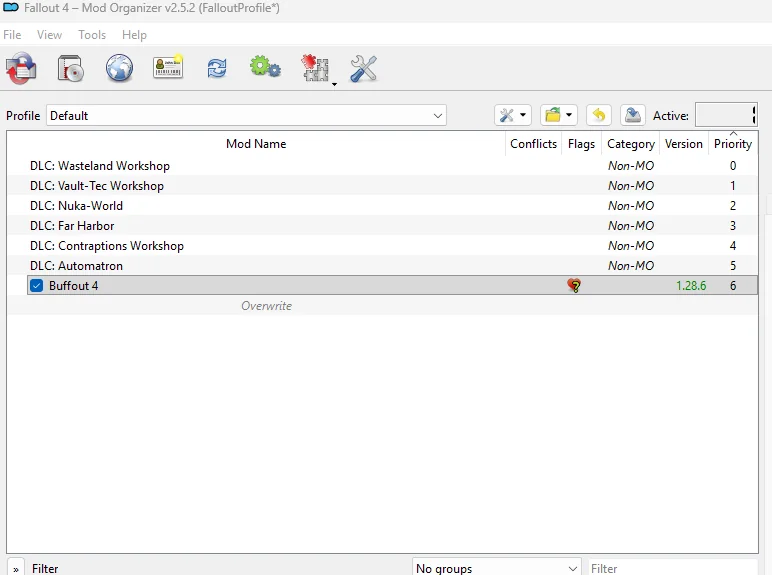
Priority. The number in the Priority column is your install order. When two mods change the same file, the higher number wins. For most mods the default is fine, and a guide will tell you when something needs a specific spot.
Mod Organizer 2 is ready
That's the foundation in place. Our Skyrim and Fallout 4 guides pick up from exactly the instance you just made.
Setting up another game? See all setup guides.
Troubleshooting
The problems people hit most, and what fixes them.
Clicking Mod manager download does nothing. What's wrong?
Mod Organizer isn't registered to handle Nexus links. Open Settings, then the Nexus tab, associate Mod Organizer with NXM links again, then click Mod manager download on the Nexus page once more. Your browser may ask permission to open Mod Organizer the first time; allow it.
A mod installed fine but does nothing in game.
Check its checkbox in the left pane. Installing a mod doesn't turn it on; ticking it does. Also make sure you start the game with the Run button in Mod Organizer, because launching from Steam skips all your mods, and check the mod's Nexus page for other mods it requires.
What does "No category found" mean?
Mod Organizer can't match the mod's Nexus category to one of its own. Categories only group mods in the left pane and have no effect on whether a mod works, so click Proceed. Disable stops the message appearing.
The log says the game is in Program Files. Is that a problem?
It's talking about your game install, not Mod Organizer. It's usually fine. Moving your Steam library out of Program Files avoids permission problems later, but it isn't required to follow our guides.
My DLC shows as Non-MO. Should I fix that?
No. Non-MO means the game manages that content rather than Mod Organizer. That's how DLC is supposed to look, so leave those entries alone.
Portable or global instance?
Portable. It keeps every mod, download and profile inside the folder you installed Mod Organizer to, which makes the setup easy to back up, move or delete. Global instances scatter files through AppData.
Can one copy of Mod Organizer 2 handle several games?
With portable instances, install a separate copy for each game, in its own folder such as C:\SkyrimModded and C:\Fallout4Modded. A copy can only hold one portable instance, and keeping games apart means they never interfere with each other.
My download went to the wrong game.
If you keep several copies open, the download goes to whichever one Nexus links are associated with. Check the game name at the top of the Downloads tab before you install, and re-associate NXM links from the copy you want to use.
Still stuck?
Supporters get hands-on help: we'll work through mod conflicts and broken downloads with you, one to one. Not a supporter? Write to us anyway if anything in this guide looks outdated or broken.
Thanks to Tannin, who created Mod Organizer, and to the Mod Organizer 2 team, who keep it going today. If it makes your modding easier, endorse it on Nexus.
Gaming AI is an independent service and is not affiliated with, endorsed by or connected to Mod Organizer 2, Nexus Mods or any game publisher. Mod Organizer was created by Tannin, and Mod Organizer 2 is maintained by the Mod Organizer 2 team. Game and mod names are the trademarks of their respective owners and are used here only to describe compatibility.